It is not necessary to install AniTa on every PC that is going to run the software. Instead you just install AniTa once on the central server and then add a link from each workstation to the AniTa software on central server. The link would normally be from the workstation's desktop and/or start menu.
The license codes are installed on the central server, and these apply to all workstations; one license is still needed for each workstation that will run AniTa.
When it is desired to install a newer version of AniTa, you only need to upgrade the central server and then all workstation have access to the new AniTa software.
If one or more generic configurations are to be used by all users, then these can also be placed on the central server. Alternatively it is possible for users to place their individual configuration files on their local workstations. A combination of local and server-based configuration files is also possible.
The system administrator can make the AniTa installation on the central server read-only, to protect it from accidentally being changed or deleted. Normally only the system administrator would have write access to the central server, being able to upgrade AniTa or change the generic configuration files.
This applies to AniTa version 3.5.0 (and earlier). The problem occurs when connecting via TCP/IP. AniTa 3 will still run over NetBIOS and asynchronous connections, even with IE5 installed.
When Windows has Internet Explorer 5 installed, the 16-bit socket interface used to access TCP/IP is changed.
When AniTa attempts to connect via TCP/IP the following error will ocuur:
ANITA caused a General Protection Fault in module ANITA.EXE
AniTa version 4 (and later) are 32-bit programs and are not effected. To permanently resolve this problem, use the 32-bit version of AniTa when running on a 32-bit version of Windows.
This problem is resolved in AniTa version 3.5.1
AniTa has two kinds of DDE functionality. It can be configured to work as a DDE server, as a DDE client or as both.
Samples of Visual Basic programs to work with AniTa can be found on our internet server located in the directory: ftp://ftp.april.se/pub/anita/dde
To configure AniTa's DDE capabilities, select Preferences from the Config menu. Then choose the DDE dialog box. To configure AniTa as a DDE client, use the following settings:
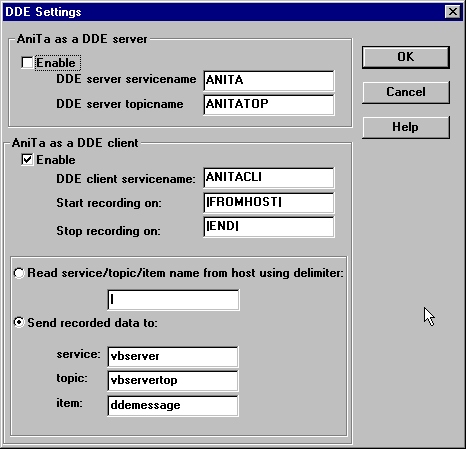
The above example "hard codes" the configuration parameters of the DDE server to which AniTa will send data. Data will be sent to the item called "ddemessage" in a topic name of "vbservertop" within a DDE service called "vbserver".
When AniTa sees the start string |FROMHOST| in the data coming from the host, AniTa starts collecting all incoming data to a buffer. (this is transparent to the AniTa user). When AniTa sees the stop string |END| in the data stream from the host, the collected data is sent to the DDE server.
A simple test from UNIX to see that this link is working is to use the echo command. This will send a string to AniTa. If the string containd the configured start and stop strings then the data in between will be sent to the configured DDE server.
In order to send the string "hello from UNIX" use the following command:
# echo "|FROMHOST|hello from UNIX|END|"If on the other hand you want to be able to specify the destination DDE server from within the host, rather than have it "hard coded" in AniTa, change the AniTa DDE parameters as follows:
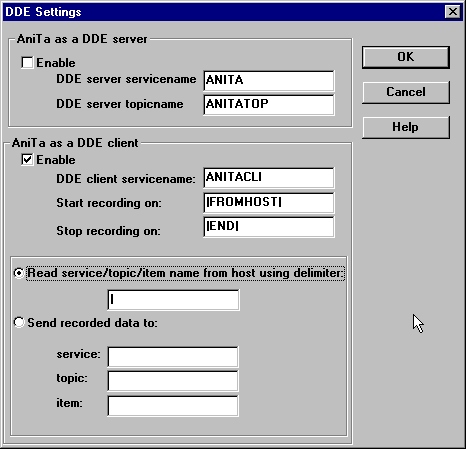
This will read the DDE server parameters (service, topic and item names) from the string send by the host. They should immediately follow the DDE start string and be seperated by the delimiter specified, in this case the default vertical bar.
In order to send the string "hello from UNIX" to the DDE server specified, use the following command:
# echo "|FROMHOST|vbserver|vbservertop|ddemessage|hello from UNIX|END|"
![]() Get
the VBSERVER.EXE program
Get
the VBSERVER.EXE program
![]() Get
the source of the VBSERVER.EXE program
Get
the source of the VBSERVER.EXE program
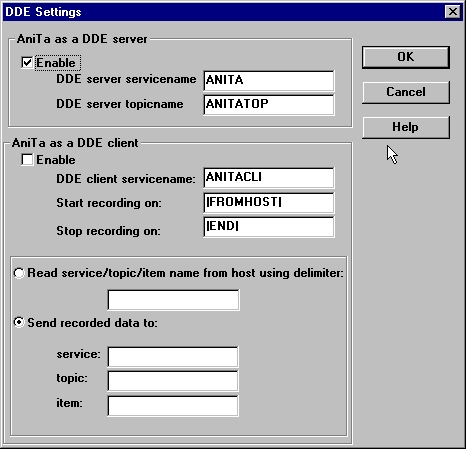
To configure AniTa's DDE capabilities, select Preferences from the Config menu. Then choose the DDE dialog box. To configure AniTa as a DDE server, use the following settings:
Once you have configured AniTa as a DDE server, you can send it commands from a DDE client application. There are two methods of sending commands: DDEPoke and DDEExecute. Data is returned to the application from AniTa using DDERequest. AniTa supports three DDE commands: TOHOST, TOHOSTX and GETTXT.
The GETTXT command has two forms; it must be supplied with either four or nine parameters. The short form copies the data as it is on the screen, appending a CR/LF after each line. The long form works just like AniTa's 'table copy' function. The five extra parameters in the long form corresponds to the checkboxes and radio buttons in the 'copy table' dialog box.
The parameters to GETTXT are sent as string containing a semicolon-separated list of integers. The parameters are:
To send commands to AniTa via DDEPoke, send to an item with the same name as the command. You cannot send embedded NULL characters in the string. The poked string's maximum length is 100 characters.
For example, you could poke the string "getinfo karlsson<cr> Tell AniTa what to read (all 80 columns and 24 lines):
It works by first sending the command "clear" to UNIX, and waiting 3
seconds for this to be performed. Then it sends the command "date", the
result of which will now appear on the top two lines of the already cleared
screen. After 3 seconds, it reads the first 30 characters of the line containing
the UNIX date and inserts this into the Word document together with a comment.
It is not necessary to use the ddedelay, but it does make the example simpler.
To record the communications in a trace file, perform the following
steps:
This trace file will contain all the characters and escape sequences
sent by the host to AniTa and all the keyboard input sent by AniTa to the
host.
If you are using this file to report a problem to support, please send
the AniTa configuration file "anita.wcf" as well as the "anita.trc"
file. This will enable support staff to play back your recording, using
you same configuration and see the problem as it appears on your screen.
Fix: Toggle the Scroll Lock key and verify that this is really the problem.
You can permanently remove the Scroll Lock mapping the following way:
DDE Command:
DDEPoke
DDE Service:
ANITA
DDE Topic:
ANITATOP
DDE ITEM / AniTa Command:
TOHOST
String:
getinfo karlsson<cr>
Sending commands via DDEExecute
To send commands to AniTa via DDEExecute, send a command to the AniTa's
service/topic pair, prepending the data with the command name and a semicolon.
There must be no space between the command name and the semicolon. To send
the string in the example above, you would DDEExecute the string "TOHOST;
getinfo karlsson<cr>
DDE Command:
DDEExecute
DDE Service:
ANITA
DDE Topic:
ANITATOP
String:
TOHOST;getinfo karlsson<cr>
Getting data via DDERequest
To obtain data from AniTa's screen, first send a command using DDEPoke/DDEExecute
telling AniTa which part of the screen you wish to read, and then issue
a DDERequest to item TXTRET to read the data.
Read the returned data:
DDE Command:
DDEPoke
DDE Service:
ANITA
DDE Topic:
ANITATOP
DDE Item / Anita command:
GETTXT
String:
0;0;80;24
DDE Command:
DDERequest
DDE Service:
ANITA
DDE Topic:
ANITATOP
DDE Item / Anita command:
TXTRET
A sample Visual Basic DDE client
We provide on our ftp server, a sample Visual Basic program that
can be used in conjunction with AniTa to test its DDE capability. We provide
both an executable program and the source.
![]() Get
the VBCLIENT.EXE program
Get
the VBCLIENT.EXE program
![]() Get
the source of the VBCLIENT.EXE program
Get
the source of the VBCLIENT.EXE program
A sample Microsoft Word macro
The following VBA (visual basic for applications) code uses DDE via AniTa
to obtain the time from the host and insert it into the current Word document.
It has been tested with Word 97 under Windows 95. AniTa has to be running
for this to work.
Public Sub MAIN()
Dim ChanNum
Dim a$
ChanNum = WordBasic.DDEInitiate("ANITA", "ANITATOP")
If ChanNum <> 0 Then
WordBasic.DDEPoke ChanNum, "TOHOST", "clear
How to create a Trace
Sometimes when a problem occurs running an application in AniTa, the resolution
can best be determined by creating a trace file. This trace file contains
the all communications between the host computer and AniTa.
You have now created a trace file. It will be called "anita.trc" and will
be located in the same catalog as the configuration file used to start
AniTa. This is normally "anita.wcf" located in the "C:\Program Files\AniTa"
catalog.
In the Config menu, go to the Preferences -> View dialog box.
Disable "connect when started".
In the Config menu, go to the Preferences -> Files dialog box.
Make sure that the "Com Recording/Trace File" name is set to "anita.trc".
Scroll Lock
Problem: AniTa connects OK (the toolbar phone gets green) , but there is
nothing on the screen.
Reason: The default Scroll Lock mapping in AniTa version 3 and 4 is %hold%
which is used to temporarily hold data reception.
1. enter the keyboard mapping dialog.
2. click on Scroll Lock on the graphical part.
3. click on delete button.
4. click OK to leave the dialog.
5. go back in and verify that %hold% mapping is now gone.This default
mapping has created a lot of support and is therefor removed in AniTa version
5.Upgrading to AniTa 5 doesn't help since all settings including keyboard
mapping is preserved in an upgrade.You also need to go through the steps
above. New installations will however not get %hold% mapped.
![]()
Back to April's Home
Page
Webmaster: keith@april.se