WHITE PAPER
AniTa - Windows for text-based applications
- AniTa - new life for text-based applications...
- Life before AniTa...
- Life with AniTa...
- How it all works...
- AniTa magic step one...
- And AniTa can do much more...
- And AniTa can do even more...
- Getting started...
- April system design with references...
AniTa - new life for text-based applications...
Legacy computer systems still do the jobs they were designed for but find themselves in a different world that is trained and wired for Windows.
Far from all applications are written for Windows. Face the job of re-writing them. Do they have to be re-written or is there a smarter way?
Look at the Volkswagen 'Beetle' that has made a successful return - in a new shape. Your legacy system can do the same thing by being transformed into a true Windows partner without changing a line of code and, in fact, without even taking the application down.
That is what this White Paper is all about.
AniTa is the easy route to bring your text-based applications to Windows. Users enjoy familiar mouse-driven actions and drop down menus in a highly appealing graphical environment. You become a hero without risk and without programming.
In this paper we will go through - step by step - how a text-based application with its monochrome screen menus can be transformed into a full-featured Windows design.
Let's start with a couple of examples:
1. A software company has developed applications before Windows and now has lots of clients. To re-write the applications for Windows means that large quantities of code, which already work well, have to be re-written and that the developers have to learn how to use new tools. It takes a lot of time and a lot of money. All they really want to do is to be able to use their applications in Windows. AniTa can take care of this at a low cost - and immediately! As well, they can - with AniTa - add multimedia to their existing applications and make them even better.
2. An insurance company, a bank or other large company has a 3270-based mainframe application that works well. But, employees are always complaining that the set-up is old-fashioned and the program cannot run on Windows. To re-write the system costs a fortune and involves a risk, as large-scale development projects can easily get out of hand. AniTa lets the company employees use Windows with a minimum of investment and makes them happy!
In short - AniTa extends the life of the legacy systems, protects your investments and gives the users a modern, uniform and standardized way of working - namely Windows.
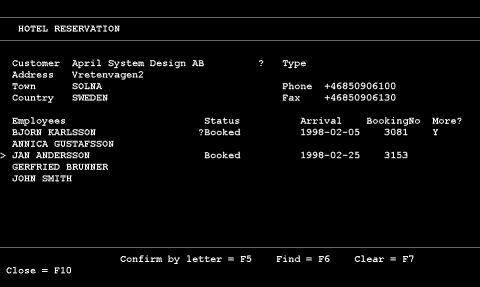
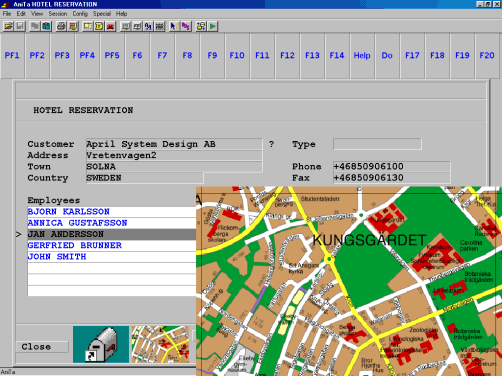
Before AniTa ......
![]()
...... and after
With AniTa you build your own screen displays. You can add color, text areas with graphics and function keys with 3-D boxes and pictures - clickable with the mouse. The users can then work in a Windows environment that most people are very familiar with.
And AniTa can even be installed on selected PCs in the network, while other PCs retain the monochrome text-based menus. For example, some members of staff - who are used to Windows - might prefer AniTa. Others, who are highly familiar with the text menus, may want to retain them. AniTa allows complete freedom of choice for everyone.
AniTa has been around since the early 1990s and has been developed
continually. There are now hundreds of thousands of satisfied users the world
over.
![]()
Life before AniTa...
The development of commercial computers really gets going during the 1960s. All larger companies build up computer departments with their own machine park. They train operators, systems and applications programmers. A great deal of effort is put into the development of applications. The systems are 'tailor-made' for the needs of a particular company and are used in production. Everyone uses batch processing.
After a while, along come database programs and a gradual shift towards interactive processing. The major programming languages are released in interactive versions and new programming languages are introduced. The old systems are converted, adapted and extended. Nobody contemplates replacing them with completely new systems. It would cost far too much money and effort - besides which, the systems are usually very reliable after many years of production.
During the 1970s and 1980s, new developments continue to come thick and fast. Computers are now being used in many new areas, such as sales and production support. The user-interface consists of text menus in monochrome. The systems are 'still going strong' even today and will probably continue to do so, at least in the foreseeable future.
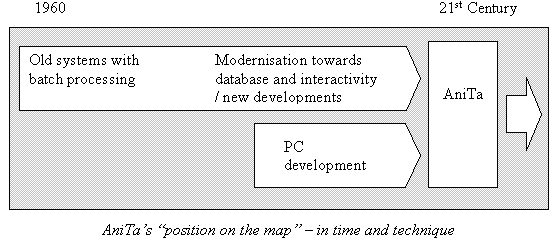
Parallel with this development, the PC really comes into its own, mainly thanks to the Windows concept which is successful all over the world wherever there is a PC. The large selection of software programs, the color graphics, 3-D and the mouse pointer make this possible. There is nothing to suggest that this trend, within the foreseeable future, will be broken. What development company, within the Information Technology sector, would even contemplate building up something completely new as a replacement for Windows? Hardly a realistic business proposition!
The PC has acquired the position where 'everybody has one' and replaced 'the
dumb' terminals. This is all well and good - but the text-based applications
with their monochrome screen menus live on. And they often lack a uniform
standard for the user. This is where AniTa fills its purpose.
![]()
Life with AniTa...
So just what is AniTa?
- AniTa is basically a terminal emulator for Windows 3.1, Workgroups, 95/98, Windows2000
and NT.
- AniTa is able to do a
lot more than just terminal emulation.
- AniTa is a special software program which transforms monochrome
menus into full-fledged Windows menus with color, 3-D, mouse support, multimedia etc.
- AniTa does not
interfere in any way with the existing legacy
application.
- AniTa is a product, which has been continually developed hand-in-hand with Windows - since the beginning of the 1990s - and this will continue in the future.
AniTa - who is it for?
- For you who have text-based applications which are 'tried and
true' and function very well (IBM/MVS, VAX/VMS, UNIX etc.).
- For you who have put a great deal of time and effort - in personnel and investment - into
building up 'tailor-made' solutions and adapting them to meet the
future.
- For you who want to keep your text-based systems because they do what they are meant to do, administratively as well as strategically.
Why AniTa?
- AniTa increases
the life span of your legacy applications and
protects your investments - software as well as
hardware.
- AniTa gives its users a modern and up-to-date method of working.
- AniTa creates uniformity where all users can work with all applications in
a Windows environment.
- AniTa creates a standardized method of working for all text-based systems in regards to menus, function keys, color, form etc.
How it all works...
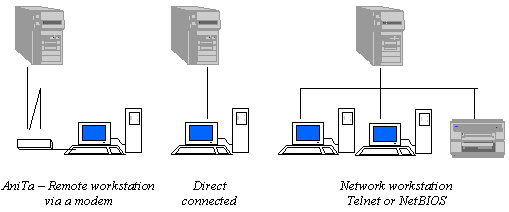
AniTa consists of a complete array of programs (see the illustration below) which include terminal emulation and all Windows graphics and logic. The original screen display - text-based and monochrome - remains in the system even after AniTa has been installed. That is the part of the application that AniTa links into. The difference is that it is no longer seen by the user, but will from now on be situated in the 'invisible' part of the system. Everything is now done from the new Windows-based screen display.
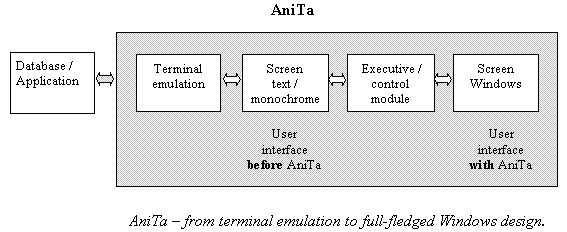
AniTa's technical environment
- AniTa emulates a great majority of terminals on the
market today. For example: VT220/320, WYSE, SCO console, ANSI and
3270.
- Host computer systems that AniTa 'talks' to are,
for example, UNIX and LINUX systems on most of today's computers, such as
IBM, VAX, HP, SUN and WYSE.
- AniTa's communications platform is Asynchronous, NetBIOS or Telnet TCP/IP.
AniTa magic step one...
Color, graphics, 3-D and mouse support
With AniTa, new personalized screen displays can be built up. In order to simplify the process, AniTa has a large number of pre-configured settings - built up according to Windows standard. Here, monochrome screen displays can be turned into color, graphics can be added to text-fields and function keys can be provided with 3-D boxes and pictures - clickable with the mouse. The user can then work in a full-fledged Windows environment in which it is likely he/she will immediately 'feel at home'.
The description below covers the most significant parts of AniTa and shows the possibilities the product gives for working on the creation of a new design for your screen displays.
How AniTa software is installed and what is initially required, is described under the heading 'Getting started...'
AniTa has drop-down menus and toolbars. It is with these that the configurations are set for color, graphics, 3-D and the mouse. The starting point, however, is the text-based screen displays. It is from there you plan what you want to change - what you want it to look like. Then you go into AniTa's menus and configuration boxes and realize your plans. It is best to proceed by trial and error. Use AniTa's pre-defined settings, if at all possible, for an optimum result.
All the configurations you set for your screen display can be saved in one or more configuration files (.wcf). You can lock these files to prevent unauthorized access.

Color settings are defined under the heading 'Colors and Attributes'. AniTa's color chart is to be found there. The screen background color is set here, and the color of any text on the screen i.e. foreground color.
The text attributes (bold, underline, invert etc.) that may occur in the application should also be associated with a color, for example bold text can be made blue with a white background. The result of the various color choices you make, are shown directly in a sample screen so that you can try out various combinations until you are satisfied.
Three-dimensional effects in a screen display make the text considerably easier to read, besides looking nicer. Select 'Boxes' to create 3-D boxes and lines.
On the color chart, you mark the color - and thereby indirectly the text attribute - which is to have a 3-D attribute. Then you choose which type of box you want. While setting colors, you have chosen to define 'bold' as being blue against a white background. Now you choose to link one of these colors with an inward-facing 3-D box. The result is that all bold text will be shown on the screen in a box and in blue with a white background color. In the 'sample text' screen, you can see what it is going to look like. 3-D effects tend to look best against a gray background.

![]()
AniTa has built-in mouse support. This means that the mouse can be used to point and select any text fields on the screen.
For example, you can start a program from your menu, '1. Order entry', by clicking with the mouse pointer on the figure '1' - instead of using the keyboard.
A terminal usually has a range of function keys that are not found on a PC. AniTa automatically places these function keys on the screen as 'hotspots'.
In AniTa, hotspots are buttons that are clickable with the mouse pointer. The buttons are pre-defined with the same function they have on the terminal keyboard.
On older screen menus the functions often look something like this: 'Close = F10'. These should be converted to clickable buttons. You create them under the option 'Preferences and Dynamic hotspots'. There you enter which screen text you want converted to a button, e.g. 'Close' and which function key the button should activate i.e. 'F10' to close the action. AniTa takes care of the rest.
Dynamic hotspots means that wherever the defined text - in this case 'Close' - appears on the screen, it is transformed into a clickable button.
The color and form of the buttons, and the font, are pre-defined with standard settings. If you wish to change the font and color, you can do so under the heading 'Font and Dynamic Hotspots'.
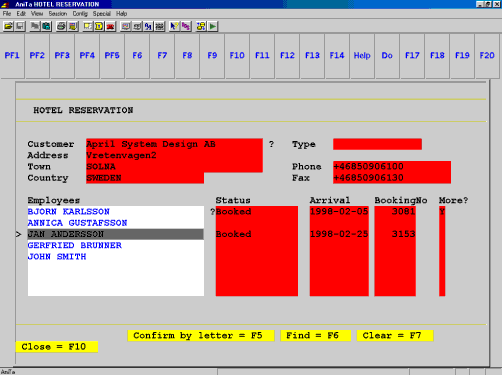
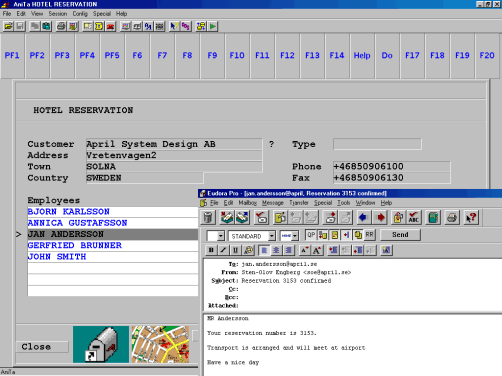
A hotscreen can be used where there are special requirements for certain screen displays - for example functions and mouse support - and the general settings are unsuitable or insufficient. A hotscreen can have a design and logic entirely of its own, such as buttons with pictures and buttons that generate ready-made text fields or start the user's e-mail program.
What AniTa requires - to make this possible - is a unique marker to recognize the screen, for example a screen-title for every hotscreen, so that the correct configuration is activated for the particular picture. In this instance, the marker is 'Hotel reservation'.
![]()
AniTa supports a variety of fonts (Windows/ANSI, OEM/DOS) and screen displays for 80 or 132 columns. AniTa automatically switches fonts when the number of columns is changed.
With the option 'Font and 80 or 132 columns', you can configure the desired font, font-style (bold etc.) and size. In the sample-screen you can see an example of the font you have defined.
In the AniTa menu and 'View' there is an option - Scale view to font - which
automatically changes the size of the window so that all the text fits in, and
another option - Scale font to view - if the window is changed horizontally.
![]()
And AniTa can do much more...
File transfer
AniTa also has programs for file transfer (via FTP) from or to a host computer. The transfer can be handled interactively - direct from the AniTa menu. If the file transfer function is often used, it is simpler to create a pre-defined script (text-file) with the information required. When script is used, the file transfer can be started automatically via an icon in the user's Windows menu.
File transfer is used, for example, when the user wants to move information from the host computer to his own PC. AniTa ensures that the format and text font of the information - 'on the move' between host computer and PC - is correct.
The independent FTP-client for file transfer supports standard File Transfer Protocol via TCP/IP.
You activate the file transfer function from the AniTa menu 'File' or from the toolbar and thereby open the FTP-menu. This is where you define the settings required by the host computer, such as the computer's name and address and the user's name / password. The FTP-menu lists the directories and files that are available locally as well as in the host computer. Where there are problems it is possible to activate a trace file. This will show a description of everything that happens during the file transfer.
If you use asynchronous communication, you can transfer
your files via Kermit, X/Y-modem and Z-modem.
![]()
Dynamic Data Exchange - DDE
With AniTa, it is possible for a host computer application to communicate with Windows applications, which it normally cannot do. It is necessary to have a DDE client and a DDE server. AniTa can act as both server and client.
A user can work in Excel, for example, and from that program request information (e.g. order statistics) from the host computer's database. AniTa passes the message on - via the order application - to the host computer and conveys the answer directly to Excel.
Dynamic data exchange is an interactive function in real time. You can use DDE between your host computer applications and Windows applications or between several of your host computer applications, for example between an order and a production system.
When you wish to activate AniTa's DDE client and server, you go in via
AniTa's menu, 'Config', 'Preferences' and on to 'DDE' and 'DDE settings'. Here
you define your send-string and say where it is to be sent for further handling
by the receiver application's DDE function.
![]()
Multimedia
Existing applications can be modernized and improved by using multimedia.
If, for example, there is a spare-parts system stored in the host computer and a spare-parts catalogue with blueprints kept up on a bookshelf, then it might be a good idea to utilize the multimedia function. The catalogue can be on a CD or a server. AniTa makes it possible to access it direct from the spare-parts application and display the blueprints on the screen in a Windows environment.

Multimedia - blueprints for spare parts or a road map to the hotel or... Our imagination and AniTa's reality mean undreamed possibilities.
AniTa has support for all standard Windows MCI (Media Control Interface) command strings. MCI commands have to be installed in the existing application. This means that you must - in just this one instance - go in and make additions to the application software. Developers with knowledge of the original system should therefore install multimedia.
All multimedia devices of today and tomorrow , for example Animation, Digital Audio, Digital and Analog Video, can be accessed from your host computer.
Via the AniTa-menu, 'Config' and 'Preferences' you can find 'Multimedia' and
its configuration box. Here you can define a number of settings in order to get
status information when multimedia is in use.
![]()
Restricted access
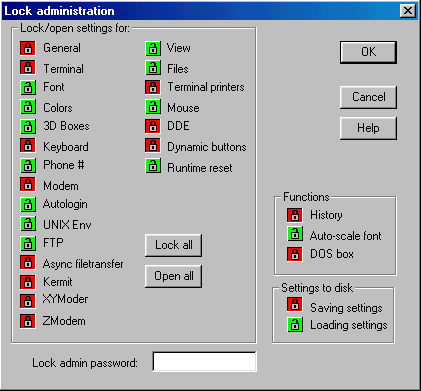
In order to 'protect users from themselves' AniTa has a built-in security system to prevent accidental changes to AniTa's configurations. For example, the host computer, the terminal and keyboard settings can be locked, or unlocked, on an individual basis - for each user. The locks can be password protected. It is best if the system administrator personally sets and changes locks. It is also possible to completely prevent unauthorized access to read or change configuration files (.wcf).
In the AniTa menu under the heading 'Config' you can
find 'Lock settings' and its configuration boxes. This is where you decide the
security level you want for all of AniTa's configurations.
Auto login
With AniTa it is possible to log in to the host computer by entering a name and password, just a password or completely automatically. The application can also be started automatically. The login procedure can be made invisible - the screen remains blank - until the program comes up. In that way, the user never needs to see the login sequence.
In the AniTa menu under the heading 'Config' you find 'Auto login' and its
configuration boxes. This is where you set which login routine you want to use.
![]()
Script
Script can be used if additions need to be made to the existing application. The advantage of putting these in script is that it is not necessary to interfere with the original software program. In AniTa, it is possible to create and run script via an editor - compatible with 'Visual Basic editor'.
Imagine a customer system stored on the host computer; a useful new function might be to be able to check - direct from the screen - if a new customer is credit-worthy.
In this case, a script is written which fetches customer information from the screen, searches for the correct database and delivers the answer on the screen. The script is then linked to a 'hotspot' so that the user - when making the check - only needs to click with the mouse.
If you want to create or change script, you go in via the AniTa menu, 'Edit' and 'Edit script'. Here you find the editor and all of its program commands.
You can then run your scripts either directly from the
AniTa menu, 'File' and 'Run script' or from the hotspots that you have
configured in order to activate your various scripts or by sending a command
from the host computer.
![]()
Printing
AniTa supports print screen, terminal printing or print to file - initiated by the user or the host computer. Printers can be connected to a network and/or to the workstation where AniTa is installed.
Print screen can be in color or black-and-white, and the font can be scaled to fit the paper. The screen printing facility can be used several times in succession to print to one and the same sheet of paper. Terminal printing allows the host computer to print directly to a PC printer. 'Print to file' can be used if, for example, it is necessary to forward an order confirmation from the system - via computerized fax - to the customer.
AniTa supports three different terminal printers and one print file, which dynamically can be controlled from the host computer.
AniTa utilizes a terminal printer method that removes the need for driver routines and other special tricks to achieve a completely transparent printout. The pre-defined value for the terminal printer is 'Windows Default Printer' instead of LPT1, 2 and 3. Printers can be connected to a parallel port, serial COM port or to one of the computers in your network. One printer at a time can be active.
You can define the print settings from AniTa's menu under 'Config', 'Preferences' and 'Terminalprinter'.
When you want to do a printout of the screen, under the heading 'File', a
print box will appear on the screen and you can select 'printer' or 'print to
file'.
![]()
And AniTa can do even more...
Multi session
Several AniTa can be active at the same time. The different AniTa windows can be connected to one and the same host computer or to different host computers.
For example, you can run a customer database on one host computer while working in another window with the order entry system on another host computer.
Here it is possible to use AniTa's 'Edit' functions to copy and paste
information from one application to the other. For example, names and addresses
can be copied from the customer database into the order entry system. If Word is
running, the customer name and address could be copied to Word for printing
labels etc.
![]()
DOS box
Where required, a DOS box can be started from AniTa's menu under 'Special'. When the DOS box has opened, this gives access to the DOS command line and the usual DOS functions such as listing all the directories and files, or executing programs.
For ordinary users, the DOS box option can be removed as this function is primarily for developers.
Any DOS or Windows program can be started via AniTa from the host computer.
![]()
History rows
Lines that have been displayed on the screen earlier can be stored in the history buffer and the user can later go back and view them.
AniTa can store up to 400 lines. The line memory stores a copy of all the rows that have been scrolled up the screen. The line memory can be activated at any time and displayed to show what has happened previously. This is done in the AniTa menu under 'View' and is defined when the terminal is configured.
'History rows' is an easy way to transfer print data to
other applications. For example, you can print a report to the screen, scroll up
and select all lines you want to copy and paste into Excel. Use 'History rows' if you want to transfer more data than
the visible lines on the screen.
![]()
Getting started...
AniTa can be installed from April system design's web site. If you have AniTa on CD - start Windows and then insert the CD - the rest is done automatically.
License and Conditions is the first thing you come across when starting AniTa. Read through the conditions. Click 'Accept' if you want to have AniTa for a 30-day evaluation. If you have a license - click 'Activate AniTa' and type in your license code.
The configurations that you have to set are in AniTa's drop-down menus. Here you select 'General settings'. In order to get started, in the configuration box you must fill in the transport protocol e.g. Telnet TCP/IP, the name of the host computer or the IP address, platform e.g. AIX. If you are uncertain, you can use AniTa's own default settings. Then you select 'Terminal emulation' and mark your terminal type and character set. Then, on AniTa's menu you select 'File' and 'Save config as...' where you save your configurations on the hard disk. You must save these under a unique .wcf file name - for example order.wcf.
Now you can connect to the host computer application - for example an order entry system. You do this by starting AniTa, selecting your config file and connecting your host computer by clicking on the telephone icon on the toolbar. The screen will then display your familiar login, where you supply name and password. When that is done, the application will present itself on the screen as usual but with AniTa's Windows appearance.
It is at this stage the existing screen displays should be upgraded with color, 3-D and hotspots - as is described in 'AniTa magic step one...'
Ergonomics is important and should be taken into consideration when you configure your screen display. We recommend that you - in as far as is practical - use AniTa's pre-configured settings which follow Windows standard.
It can make quite a difference to the user - who will be working with the screen menus every day - if the design and color settings are harmonious and discreet.
For large installations with a lot of users we recommend installing AniTa on a central server. The great benefit of doing so is easier administration and upgrade. Users can have their own unique configuration file or share a configuration file or even share a group of configuration files. Once AniTa is installed on the server the only thing that needs to be done on each workstation is to add a short-cut to AniTa onto the user's desktop.
Documentation and assistance in the form of technical operating details are available in AniTa's
menu under 'Help'. Here you can find an index - of all of AniTa's functions - as
well as detailed descriptions. You have also access to AniTa's 'Programmer's
guide' and the new (AniTa 8) Cookbook.
The Cookbook contains step-by-step examples of common design scenarios.
In addition, there are 'help' buttons for the particular function you are working with. If, for example, you are going to configure color and 3-D for your screen - and need a little extra assistance - just click the 'help' button in the configuration box.
Most of AniTa's comprehensive documentation is in English, Swedish,
German and French. Information as to versions, new features etc. for AniTa can
be found on April's web site. If you have any questions or problems you can
contact us via e-mail, fax or telephone.
![]()
April system design with references...
April concentrates upon the development of global software solutions for networking.
April's background - since the company was formed 1989 - is the design of advanced utilities and tools, based on market standards, that simplify communication and dialog between different technical platforms. Such products are, for example, Fusion95 which connects PC networks with UNIX and AniTa that offers Windows design to text-based applications.
April's focus is on advanced networking products for LAN and WAN including Internet. One example is DynaPass - a secure access system based on networking and telephony.
April has development, production and sales in Stockholm, Sweden, and in Irvine,California. April has a worldwide customer-base and reseller network. April has a staff of twenty, most of who are communications specialists.
AniTa now has hundreds of thousands of users in about 60 countries.
An evaluation of AniTa - in stiff competition - resulted in a top placing. "What a jewel... Only AniTa meets all our requirements", wrote Prosper, the software company in Australia. The man responsible for their evaluation and the product report that followed was their Operations Manager, Brian McPhail.
April's customers and resellers in Sweden include Volvo, Ericsson, EDS, Åhléns, IBM, Enator, OKQ8 and WM-data. Some of our resellers and customers outside Sweden are Nortel Networks, Abacus Systems, ACT and Compaq in USA, AID Computer in France, APT in Holland, CMS in England, Weber Informatik in Switzerland, S.I.G. in Uruguay and NETLAN in Brazil.